🖥️ Migrating to Nearly Free Speech
Table of Contents
Intro
Earlier this year, I moved my sites off of Neocities and onto Nearly Free Speech and posted my notes about doing it to cohost (RIP). john videogames on Bluesky was very kind to send me a cached copy of that post, and here it is!
Uploading your site
- If you didn’t already do this for Neocities, download something like FileZilla or Cyberduck.
- Make a new connection profile for your site. In the “Protocol” drop-down menu, select SFTP - SSH File Transfer Protocol. (Your program might call this field something else, but in any case look for something that lets you connect with SFTP aka SSH File Transfer Protocol.)
- Go to your NFS.net Member Login > Sites > whatever site you are setting up. Make a note of your username, password, and the SSH/SFTP Hostname.
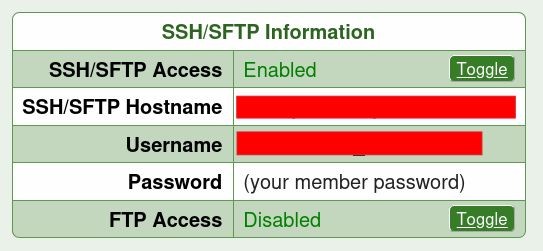
Also make sure that SSH/SFTP Access Enabled is toggled on.
- Back in your file transfer program, enter the NFS SSH/SFTP Hostname in the Host field, then your username and password. I highly recommend creating a Site Manager profile for your site (it may be called something else in your program) so that you can connect easily in the future.
- When you connect for the first time, it will ask if you allow the SSH fingerprint. Click “Allow,” and if available, check the “Always Allow” box so it won’t ask again.
- Now you can upload your files to your site!
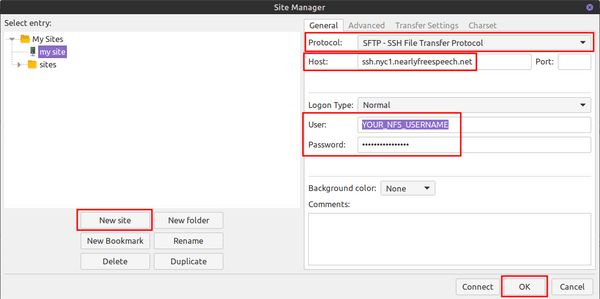
This is what my FileZilla Site Manager looks like on Linux. It might be different for you, but generally look for these fields and fill them in.
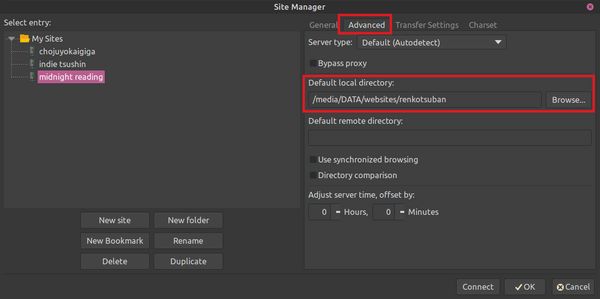
Pro-tip: In FileZilla (and probably also Cyberduck) you can go to the Site Manager, click on the Advanced Tab, and set your connection to open to a default local directory. This way you won't mix up which files to upload to which site.
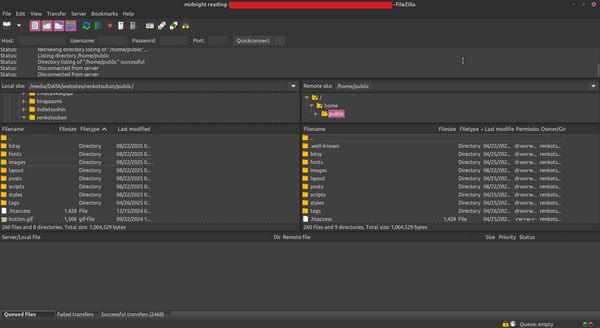
From there, just upload all your files into your site!
Set up SSL
EDIT: NFS does this automatically for users now, so you don’t need to do this step! Keeping this section in for posterity.
This is so you can have https:// for your domain name.
- Go to NFS.net Member Login > Sites > whatever site you are setting up. Make a note of your username, password, and the SSH/SFTP Hostname.
- If you are on Windows, hit Win+R, type in cmd and hit Enter. (If you are not on Windows, open whatever terminal you use.)
- Type in
ssh USERNAME@SSH_HOSTNAME. It should ask for your password, enter that in. - Type
tls-script.shand then Enter. It should ask if you agree to the user license, typeYand then Enter again. - It should install a
.well-knownfolder with all the proper SSL files on your site that will let you connect to your domain withhttps://instead of onlyhttp://.
Set up domain alias
This is so that https://www.yoursite.com and https://yoursite.com both work for your site.
- Go to NFS.net Member Login > Sites > whatever site you’re setting up.
- Near the top, it should list your NFS subdomain and your
www.yoursite.comdomain name. Click “Add a New Alias.” - Enter in
yoursite.com.
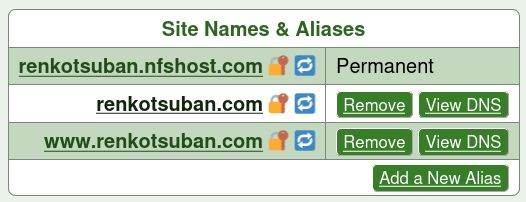
You will have yoursite.nfshost.com as its default, and can add your domain and domain aliases here.
Set up error pages
- Open a text editor and create a file named
.htaccess. - In that file, paste in
ErrorDocument 404 /not_found.html(or whatever your error page’s filename). - If you want, you can do the same for 401, 403, and 500 errors.
- Save it, then upload the
.htaccessand error pages to the root of your site.
Enable MultiViews
This is to have URLs point to pages even without the .html at the end, which is how Neocities does it.
- Open your
.htaccessfile in your text editor. - Paste in
Options +MultiViews. - Save and upload the
.htaccessto the root of your site.

My .htaccess with both the error pages and MultiViews set up.
Set up custom Bluesky username
- In your text editor, create a new file named
atproto-did. - In Bluesky, go to Settings > Account > Handle, then click “I have my own domain.”
- Click the “No DNS Panel” tab and then copy the contents of “That contains the following:”. Paste that code into your
atproto-didfile (without a file extension!), and save it. - Upload the
atproto-didfile into your site’s.well-knownfolder. - Back in Bluesky, click “Verify Text File,” and if that was successful, “Update to (domain name)”
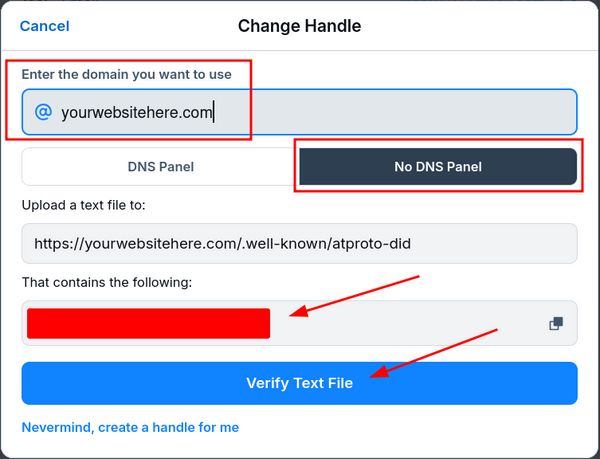
If you don't already have it, just make a folder in your site that's named ".well-known" and upload your "atproto-did" file into there.